By Nicolas Boichat, go back to main DDC/CI page.
Disclaimer: Use the method I present here at your own risk, I'm not responsible if it destroys your computer, monitor or anything else.
A monitor supporting DDC/CI.
A computer running Windows 2000/XP, with a graphic card supporting DDC/CI.
Another computer running Linux, with a parallel port, and a relatively fast processor (Athlon 2100+ works fine).
An old 15-pin VGA cable.
A straight-through parallel cable, with 25 pins at both side (PC to PC cable will not work).
An ohmmeter.
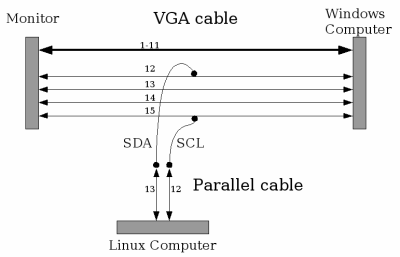
The I2C bus on which DDC/CI data is transferred uses 2 wires: SCL (clock), and SDA (data). On the VGA cable, these wire are connected on pins 15 (SCL) and 12 (SDA) (see VGA cable pinout).
Open the VGA cable by removing the plastic cover on a short length (3-4 cm), and find with an ohmmeter which wires are connected to pins 12 and 15 (no need to strip all the wires, just pierce them with a pin, without breaking them).
By chance, the voltage (5V), is also used on parallel port. So connect wire 12 of the VGA cable to pin 13 of the parallel cable, and wire 15 to pin 12. We can now monitor I2C transfer using the parallel port.

Connect this VGA cable between the computer running Windows and your monitor, and the other side of the parallel cable to the computer running Linux.
On the Linux computer, download this source file, and build it with:
# gcc -O2 pportmon.c -o pportmon
To run it, you must be root, and simply type:
# ./pportmon
It will monitor I2C transfers for a few seconds.
Go to your Windows computer, open an ssh session to your Linux machine (this is not necessary if you can switch from one to another computer in 1 or 2 seconds).
Then open your Windows DDC/CI tool (NEC/Mitsubishi NaviSet, or Samsung MagicTune for example), wait it reads all the monitor parameters (if your monitor uses the same protocol as mine, you don't need to analyze this). Then start pportmon on Linux, and change quickly a value (for example brightness), by one step (= click only one time on the arrow on the scrollbar).
Pportmon should print something like that:
-->Start
-->Byte : 01101110 0x6e
==>Address : 0x37 (W)
-->Byte : 01010001 0x51
-->Byte : 10000100 0x84
-->Byte : 00000011 0x03
-->Byte : xxxxxxxx 0xXX [index]
-->Byte : 00000000 0x00
-->Byte : yyyyyyyy 0xYY [new value]
-->Byte : zzzzzzzz 0xZZ [checksum]
-->Stop (8, 1) [8 = byte count, 1 = bits left on the last byte (1 is ok)]
If you have something totally different, for example with another address, or with stops occurring while there are bits left, pportmon could probably not get enough CPU time to get all the data (this is not a real-time process, so sometimes the OS give CPU time to others process). It happens sometimes even on my Athlon 2100+, so just retry. If it still doesn't work, try to stop CPU consuming processes, and increase the priority of the process by running it using nice:
# nice -n -15 ./pportmon
And now it should work (otherwise try to use a faster computer). Of course, if you always get the same output and if it is different from what is described in the specifications, you have discovered a new part of the DDC/CI protocol!
Simply repeat the operations described below, and find the indexes for all the parameters you can change. It would be nice to send them to me.
DDC is a trademark
owned by VESA
(Video Electronics Standard Association).
I2C is a
trademark owned by Philips.
Please do not hesitate to contact me if you see typos, English errors or any other mistake.
© Nicolas Boichat <nicolas@boichat.ch>. Last modified: July 12, 2004